I can’t think of a less fun place to spend time than an unconditioned, poorly vented crawlspace. And I’ll bet most people feel that way. Add that the building code allows the bottom of floor joists to be within 18 inches of the ground (just 12 inches below beams!) and you’ve created a no mans land only occasionally belly-crawled by the odd cable guy or plumber. And those guys are not looking for structural problems. They just want to get their work done and get out of there as quickly as possible.
So problems can fester, unobserved.
But think about it. A typical condo complex will include buildings with multiple ‘stack’s of condos, with three or four units ‘stacked’ one above another in each stack. The entire stack is ultimately supported by the foundations and framing at the crawlspace. At say $300,000 per unit you’re looking at over $1,000,000 of real estate per stack impacted by the often neglected conditions in the crawlspace.
I’ve been called on by many condominium homeowners associations (HOA’s) to check on structural conditions in the crawlspaces of their buildings. In fact, one of my first projects after opening our office in Nellysford, Virginia came about after a call for help from a property manager representing an HOA for a large block of condos.

Even the cable guy couldn’t ignore this! That CMU pier is broken in half. The decayed beam perched on the edge of the cracked pier is supporting 4 floors above!
The property manager was informed by a homeowner that a cable guy (even the cable guy guy couldn’t ignore this) told the homeowner that a foundation pier was damaged. The conditions I discovered when investigating the damaged pier led to investigations of all the crawlspaces of all the buildings.
I spent the better part of a month bellycrawling through 20 crawlspaces, photographing what I found, good and bad, to give the HOA a record of conditions at the time. All told, I must have crawled a couple of thousand feet through the worst environment I’d ever experienced, documenting and photographing decay and damage and keying all that data so that the location of any one of the of hundreds of photos could be quickly identified. This was a big help as I developed the repair plans, and the photos helped the HOA understand the seriousness of the situation.
You might think that knees and elbows would suffer after crawling in the dark for 3 weeks. You’d be right! Not fun. Not fun at all. And it’s not just the physical punishment. The air is dank. Mold and worse is growing happily everywhere. Fiberglass insulation becomes wet and heavy and falls from between the joists. The ground is muddy, or if there’s vapor barrier down, it’s covered in water that condenses out of that warm, moist, moldy air onto the cool surface of … well just about everything. Wet, muddy, moldy, smelly, dank, and pitch dark. Nice!

Mold is not the only thing growing in humid crawlspaces. I don’t know what this is – I think the fibers were reaching for the wood joists above, but I sure steered clear of it. What if it was carnivorous?!
If you’ve got a wet crawlspace, you’re not alone.
Turns out that wet crawlspaces and the resulting decay in floor systems is endemic in the southeast and northwest. The building codes have prescribed minimum venting for crawlspaces for years. In my opinion, the minimum venting requirements are/were not adequate in many cases to prevent humidity from building up to unacceptable levels, especially in the southeast and northwest. Recognizing the problem, the building codes have been updated to include ‘conditioned crawlspaces’ as an acceptable alternative to vented crawlspaces. Essentially, the crawlspace is sealed from the outside air and conditioned as if the crawl is a very short room, heating and cooled along with the rest of the building. For this to be effective, the ground must be covered with vapor barrier – I usually specify a 10 mil polyethylene barrier reinforced with cross-linked polyethylene fibers, with all edges sealed with special vapor barrier tape.
So what levels of humidity are acceptable?
Normal moisture content for installed wood framing materials typically ranges from 8 to 14%. Significant decay of wood by wood-rotting fungi will likely occur above the ‘fiber saturation point’ of lumber – at 28 – 30% moisture content. Limited decay from wood-rotting fungi may occur at moisture contents as low as 20%.

Wood framing is not the only thing attacked by fungus in humid crawlspaces. Not much left of this little mouse except his ghostly outline. I skipped lunch that day.
As a general rule, wood with moisture content less than 20% is considered safe from decay by wood-rotting fungi. However, it is recognized that at moisture contents as low as 16%, non-wood-rotting fungus may grow and “pre-condition” the wood, so that if the moisture content of wood increases later, wood-rotting fungi can quickly grow and accelerated decay may occur.
In short – it’s best to keep the wood moisture content at 15% or less to prevent most types of fungus growth and to prevent possible ‘pre-conditioning’ of the wood. This corresponds roughly to maintaining the relative humidity of the air in the crawlspace to less than 70%. Actual damage from wood-rotting fungi can be expected at moisture contents above 20%, which corresponds roughly to maintaining the relative humidity of the air at 80% or more.

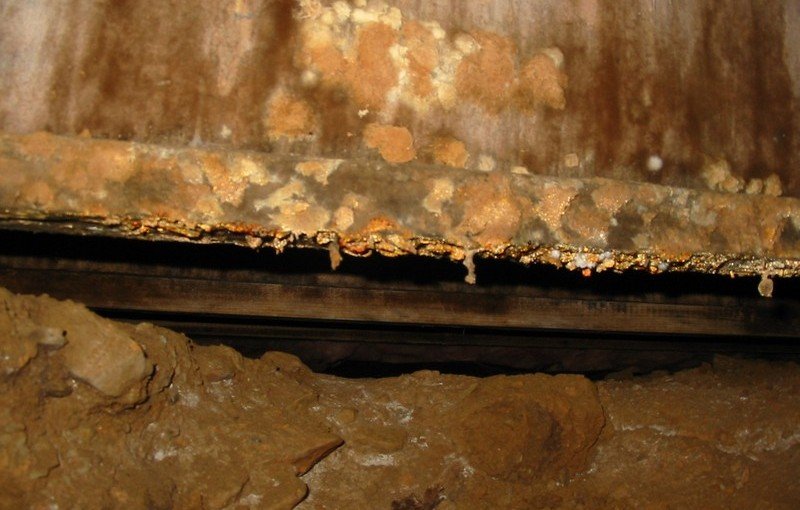
A perfect example of what not to do. A plywood web joist (like this TJI) installed within inches of a dirt crawlspace with no vapor barrier. It creates the perfect environment for a ‘fungus party’ like this one. There’s occupied space less than 12 inches above this mess!
How do you control the humidity?
There are four basic steps to controlling the humidity in your crawlspace. First, you have to identify all sources of moisture infiltration into the crawlspace – both liquid and vapor. Second, you must develop a plan to reliably maintain the relative humidity below the 70% limit. Third, (of course) implement the plan. Fourth, and very important, regularly inspect the crawlspace to verify that your plan is working. A ten minute inspection twice a year can save beaucoup bucks in structural repairs down the road.

The fungus is not messing around. It is hungry. Give it the right conditions, and it will eat.
First step, identify all moisture sources.
Before you head out, check your tool kit. A simple key plan with the building footprint drawn to scale will give you a place to take notes and key your photos. Don’t forget your extra batteries, water, pencils, moisture meter, camera, pocket tape, etc. Take advantage of the trip down under and gather as much information as you can. When you’re done, your key plan should include a rough foundation plan and a schematic floor framing plan.
So let’s get started. First, check out the exterior. If you didn’t have drawings to use as a guide to set up your key plan, take a moment to measure the perimeter of the building and create a key plan on the fly. Now look at the site. Is the ground sloping toward the building? Is the roof drainage controlled (with gutters and downspouts) or does the water from the roof just sheet to the ground next to the foundation wall? Note locations where downspouts discharge to the ground next to the foundation. If ever there are any issues with the roof, then that’s where professionals like those who offer Roofing Services come in.

Given enough time, the nasty conditions in the crawlspace will invade the living space above.
These conditions can lead to the outside of the foundation wall being essentially submerged in water. If the waterproof membrane on the outside of the wall is dicey (all too common), or the foundation drain is crushed, plugged, or not even there (again, all too common), there’s a good chance that water is penetrating the wall into the crawlspace. While you’re outside, note the position of any crawlspace vents (and if they’re open or closed) as points of reference when you’re inside the crawlspace.
Next, access the crawlspace. Easy to say, but it can mean crawling 10 or fifteen feet through the mud under a deck (are there snakes under here?) just to get to the access hatch. Once you’re in, take a few moisture meter readings of the floor framing. Do this at several locations as you crawl about to develop a mental map of where the humidity (and the associated wood moisture content) is highest in the crawlspace. If there is a vapor barrier in place, are the edges sealed? Does the barrier stop short of the foundation wall, leaving a border of exposed dirt at the perimeter of the crawlspace? As you travel the perimeter, note if the interior of the foundation walls are wet, or if the joint between the bottom of the wall and the top of the concrete footing has (or had) visible water flow. Take lots and lots of pictures, and note where the pictures were taken on your key plan. The pictures are a HUGE help as you develop your action plan.
Look for evidence of past water infiltration. If you see evidence of past ponding, mark the locations on your key plan. Note any plumbing leaks. Even small drips can create little ponds over time, and as the pond evaporates, the humidity rises. There might be water stains on the walls, or even evidence of past water flows. If you see a water channel, try to identify where the water started to flow and where it ended. Did it pond in a low point in the crawlspace? Note it on your key plan. It’ll help as you figure out how to dry things out.
During your crawl-about, sketch a rough foundation and framing plan onto your key plan. Note any damaged or decayed framing, foundation cracks or other damage.

Now doesn’t this feel better? A clean, dry crawlspace. I really appreciated the headroom too!
Finally, check for plumbing leaks. Even small drips can create little ponds over time, and as the pond evaporates, the humidity rises.
Before you crawl out, check your notes. Did you look at all the areas in the crawlspace? Your key plan should be ‘noted up’ with your observations, photo locations, etc. Before I exit the crawlspace, I like to think about what problems I’ve seen and develop a mental ‘first pass’ on what I might propose to fix the problems. The process sometimes sends me back across the crawlspace to verify one condition or another. My point is this – you’re not going to want to come back in here if you can help it. Take a moment to be sure you’ve got all the information you need. Ok. Now you can go!
I’ll follow up with steps two, three, and four in a future article.